如何在 AWS 上跑 GPU Tensorflow
这篇文章整理自 Udacity Deep Learning Nanodegree Foundation 教程的第六课 Cloud Computing。最终创建的 instance 使用的是 Udacity 的 AMI,安装有许多现成的依赖包。最主要的是,可以立即运行 GPU-tensorflow,无需设置 GPU 驱动。
第一步 创建 AWS 账户(5 分钟)
略
第二部 取得 GPU Instance 权限(5 分钟)
估计是为了防止误操作导致用户账单爆表,AWS 的高级 instance 是不能随意 launch 的,GPU instance 就是如此。
首先点击这个链接 查看当前的 instance limit。这里要特别注意,不同区域的 limit 是不一样的,区域可以在右上角切换,一般北美的机器相对便宜。以 p2.xlarge 为例,limit 一般都是 0:

申请权限的步骤是:
- 在 “EC2 Service Limits” 页面,点击需要的 instance 类型(比如 “p2.xlarge”)边上的 “Request limit increase”。这个操作没有任何费用。
- 填写所有的问题:
- “Region”
- “New limit value” 一般是 1,毕竟 GPU instance 也不能串联起来跑,一个就够了。
- “Use Case Description” 可以填写 “Udacity—Nanodegree program”
- 如果之前从来没有运行过任何 AWS instance,Amazon 可能会邮件要求用户创建一个其他的 instance 来“初始化”账户。
- 等待请求通过。一般在 48 小时内完成。
第三步 启动 Instance(15 分钟)
选择 AMI(1 分钟)
- 进入 EC2 Management Console
- 点击 “Launch Instance”

- 点击 “AWS Marketplace”
- 搜索 “Deep Learning AMI CUDA 8 Ubuntu Version” 并选择这个 AMI
- AMI 全称是 Amazon Machine Image。每个 image 包括了所有环境设置、驱动、依赖。
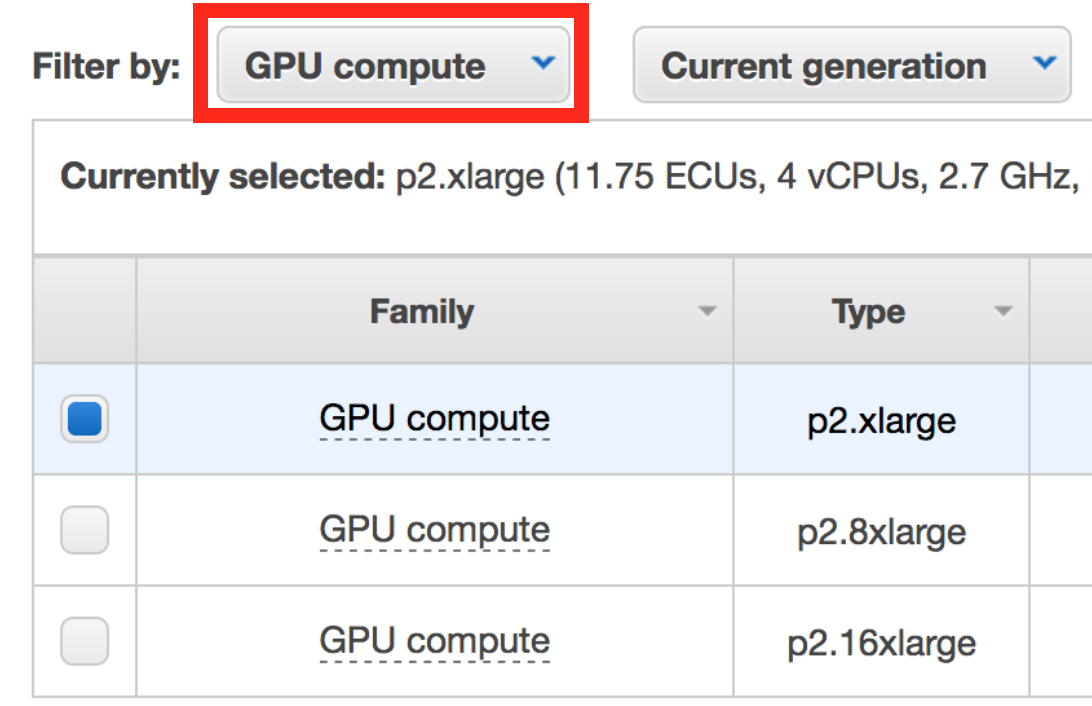
选择 instance type(1 分钟)
-
GPU compute
-
p2.xlarge(或者其他有权限 launch 的 GPU type)
-
点击 “Review and Launch”
-
先不要 “Launch Instances”
Security Groups(5 分钟)
为了在 instance 上运行 jupyter notebook,需要开放相应的端口,这是通过 security groups 设置完成的。
-
点击 “Edit security groups”
-
如图设置安全组:
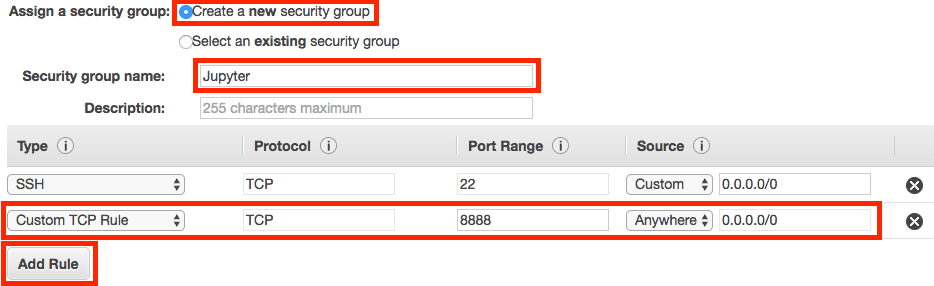
- 选择 “Create a new security group”
- 设置 “Security group name”,比如 “Jupyter”
- 点击 “Add Rule”
- 设置 “Custom TCP Rule”
- 把 “Port Range” 设置为 “8888”
- 选择 “Anywhere” 作为 “Source”,也就是可以从任意一个 IP 访问在 instance 上运行的 jupyter notebook。
-
点击 “Review and Launch”
Launch(5 分钟)
- 点击 “Launch” 创建 instance
- AWS 会要求制定一对 authentication key。这里可以选择 “Create a new key pair” 并 “Download Key Pair”,
.pem文件会开始自动下载。这个文件以后用来进入 instance,所以要妥善保存。
- AWS 会要求制定一对 authentication key。这里可以选择 “Create a new key pair” 并 “Download Key Pair”,
.pem文件下载完毕之后,点击 “Launch Instances”- 点击 “View Instances” 进入 EC2 Management Console 查看正在启动中的 instance
计费
一旦 instance 启动就开始计费了。费用明细可以查看这个链接 。由于 GPU instance 比较贵,而且 machine learning 一般不需要实时运行,所以不用的时候要及时关掉 instance。
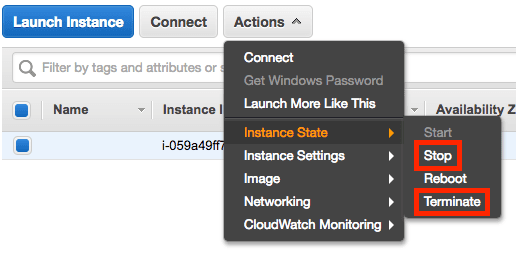
- Stop 相当于关机,硬盘资料不会丢失,开机之后还可以继续用。关机之后会收取少量的存储费用,不过非常便宜。
- Terminate 相当于销毁 instance。一旦销毁,再需要 instance 就必须重建。销毁之后不会有任何费用。
第四部 运行(10 分钟)
登陆(1 分钟)
Instance 启动之后,在 EC2 Management Console 里得到 instance 的 IP 地址(x.x.x.x),然后使用 ssh 和 pem 文件登陆:
ssh -i <pem file path> ubuntu@x.x.x.x设置 Jupyter(5 分钟)
这一步可以省略
- 创建 config 文件
jupyter notebook --generate-config
- 设置 jupyter IP,把
#c.NotebookApp.ip = 'localhost'替换为#c.NotebookApp.ip = '*'
sed -ie "s/#c.NotebookApp.ip = 'localhost'/#c.NotebookApp.ip = '*'/g" ~/.jupyter/jupyter_notebook_config.py测试(5 分钟)
使用 Udacity aind2-dl 测试 instance 和 jupyter notebook。
这一步也可以省略。
- 运行 repo
git clone https://github.com/udacity/aind2-dl.git
cd aind2-dl
jupyter notebook --ip=0.0.0.0 --no-browser-
访问 jupyter notebook,点击命令行里显示的 jupyter notebook URL,把其中的
localhost替换成x.x.x.x,也就是 instance IP 地址。最终的 URL 类似x.x.x.x:8888/?token=...,在外部浏览器访问这个 URL,应该出现运行中的 notebook -
运行 “IMDB_in_Keras_Solutions.ipynb”,所有 cell 应该都可以正常运行。